
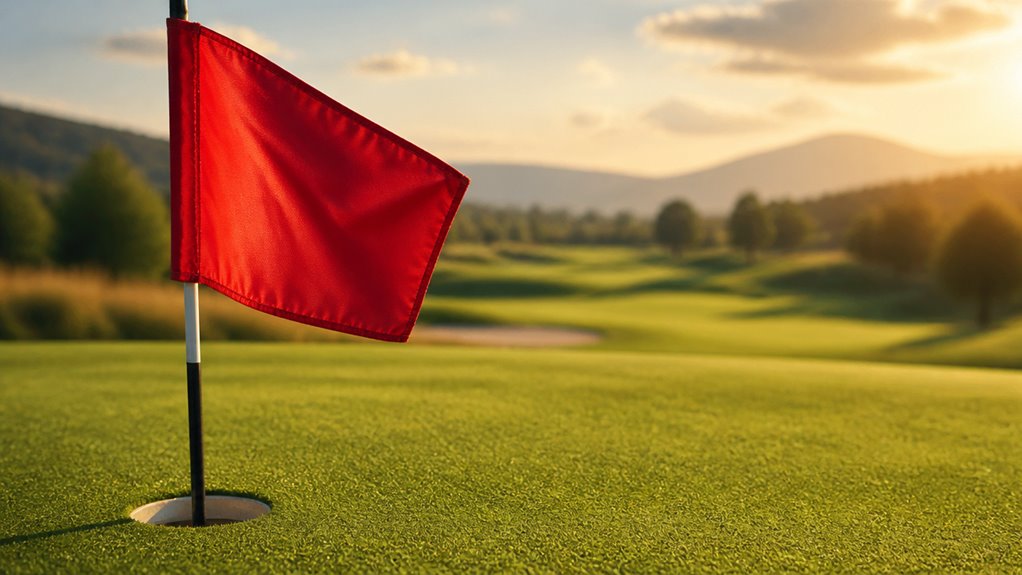
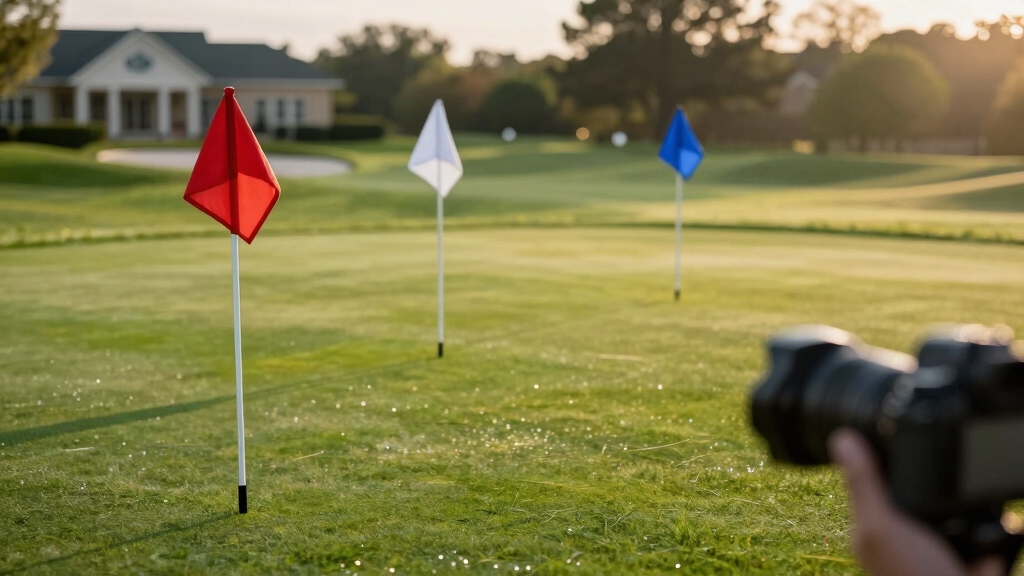
When you see golf flag colors, they guide your pin position: red means front, white is middle, and blue or black flags mark back pins.
Flagstick height further refines this. Lower flags indicate front pins, mid-height is for center, and high flags are for back pins.
Yardage markers use red for 100 yards, white for 150, and blue for 200 to estimate distance.
Variations exist, so confirming local standards helps your club choice and shot planning.
Understanding these basics sets you up to master approach strategy.
- Key Takeaways
- What Golf Flag Colors Mean for Pin Positions?
- Reading Flagstick Height to Find the Pin
- Standard Yardage Marker Colors Explained
- How to Read Sprinkler Head Yardages Accurately?
- Course Variations in Flag Colors and Distances
- Planning Approach Shots Using Flag Colors and Yardages
- Driving Range Flags and Their Distance Markers
- How Flag Colors Affect Club Selection?
- Tips for Quickly Spotting Flag Information on the Course
- Frequently Asked Questions
- How Often Do Courses Update or Change Their Flag Color Schemes?
- What Materials Are Golf Flags Typically Made From?
- Can Weather Affect the Visibility of Flag Colors During Play?
- Are Flag Colors Standardized Internationally or Vary by Country?
- How Are Flags Maintained to Ensure Accurate Distance Markings?
- Know the Flag, Pick the Right Club
Key Takeaways
- Red flags indicate the hole is positioned at the front of the green, signaling a shorter distance for approach shots.
- White flags mark the pin in the middle of the green, representing a standard or average distance to the hole.
- Blue or black flags denote back-of-the-green pin placement, indicating a longer shot distance is required.
- Flagstick height complements color, with low flags for front, middle height for center, and high flags for back pin locations.
- Yardage markers (red=100, white=150, blue=200 yards) and sprinkler head distances help confirm exact distances to the green.
What Golf Flag Colors Mean for Pin Positions?
When you approach a green, the color of the flag on the pin helps you quickly determine the hole’s exact location. This allows you to plan your shot more accurately.
A red flag means the hole is positioned at the front of the green, signaling a shorter approach. White flags designate a middle pin placement, requiring a mid-range shot.
Blue flags indicate the hole is at the back of the green, demanding a longer shot and precise distance control. Some courses use yellow flags for back-left positions or black flags as substitutes for blue at the back.
Recognizing these color codes lets you adjust your club selection and shot strategy efficiently. This optimizes your chances of landing the ball close to the hole. Properly displaying your flags with consistent flagstick positions ensures players can rely on these color signals during play.
Reading Flagstick Height to Find the Pin
Knowing the flag color gives you a general idea of the pin’s location on the green, but flagstick height provides an additional, precise visual cue.
Flagstick height offers a clear, precise visual cue beyond color to pinpoint the pin’s exact location.
By observing the flag’s vertical position on the stick, you can determine if the hole is at the front, middle, or back section of the green.
Typically, a low flag indicates the front third, a central flag signals the middle, and a top-positioned flag marks the back section.
This standardized height system allows you to quickly assess pin placement from the fairway, aiding accurate club selection and shot strategy.
While exact flagstick heights vary by course, they consistently follow this front-middle-back logic.
This makes height reading an essential skill for precise distance estimation and approach shot planning.
For best results, combine flagstick height reading with distance markers to enhance shot accuracy and course management.
Standard Yardage Marker Colors Explained
You know, when you’re out on the fairway, those standard yardage markers are super helpful. They use color codes to show you how far you’re from the green. For example, red markers indicate 100 yards, white ones signal 150 yards, and blue markers represent 200 yards.
Having these markers out there really aids in planning your approach shots. It’s all about having consistent visual distance references. Once you get the hang of these color-coded indicators, you’ll find that your shot selection and course management really improve. It makes the game a lot more enjoyable, don’t you think?
In windy conditions, adjusting your aim and club selection based on wind assessment is key to making the most accurate shots.
Yardage Marker Color Codes
Although golf courses may vary in design, the standard yardage marker color codes provide consistent distance references to the center of the green.
You’ll find these markers positioned strategically in fairways, enabling precise approach shot planning. The most common colors are red, white, and blue, each indicating a specific yardage.
Some sprinkler heads also display exact yardages for more accuracy. Understanding these colors helps you select the right club and aim your shot effectively.
| Marker Color | Distance to Green (yards) | Typical Location |
|---|---|---|
| Red | 100 | Front of fairway |
| White | 150 | Mid-fairway |
| Blue | 200 | Back of fairway |
| Sprinkler | Varies (e.g., 157) | Along fairway edges |
| Additional | Custom distances | Course-specific spots |
For golfers looking to practice and improve their accuracy, using a portable launch monitor can help track shot metrics and simulate real course yardages.
Distance Indicators On Course
Interpreting the standard yardage marker colors on the course is essential for accurate shot placement and club selection.
Red markers indicate 100 yards, white markers 150 yards, and blue markers 200 yards to the center of the green. These markers, strategically positioned in fairways, guide your approach shots.
Additionally, sprinkler heads often display exact distances like 157 yards, offering precise measurements.
Flagstick height complements these markers by signaling pin positions: low for front, center for middle, and top for back sections of the green.
While most courses follow these conventions, some variations exist; for example, yellow flags may mark back-left holes.
Understanding these distance indicators helps you confidently select clubs and manage shot strategy, ensuring better accuracy throughout your round.
To maintain course conditions, always ensure your shots respect boundaries and repair any divots or ball marks near these markers to uphold course care standards.
How to Read Sprinkler Head Yardages Accurately?
You can totally count on sprinkler head yardages to give you the exact distance to the center of the green. You’ll often see these numbers displayed clearly, like “157 yards.” By interpreting these figures accurately, you can really enhance your approach shot planning and make better club selections. Understanding how course design influences speed can also help you anticipate how conditions might affect your shot timing and overall round duration.
Interpreting Sprinkler Yardage Numbers
When approaching a shot, relying on sprinkler head yardage numbers can provide precise distance measurements to the center of the green. Sprinkler heads typically display exact yardages, such as 157 yards, allowing you to plan your club selection accurately.
These markers complement the general colored yardage markers: red for 100, white for 150, and blue for 200 yards. They offer specific, fine-tuned data.
| Marker Color | Distance to Green (yards) | Purpose |
|---|---|---|
| Red | 100 | Front center of green |
| White | 150 | Middle center of green |
| Blue | 200 | Back center of green |
| Sprinkler | Varies (e.g., 157) | Exact yardage to green center |
| Additional | 83, 153, 202 | Specialized tee and range markers |
Use these numbers to gauge distance precisely and improve your shot accuracy. For golfers who want to refine their distance control further, using a portable launch monitor can provide advanced metrics to complement sprinkler yardage readings.
Using Sprinkler Data Strategically
Leveraging sprinkler head yardage data can markedly enhance your approach shot accuracy by providing exact distances to the center of the green. Unlike colored markers, sprinkler heads often display precise yardages, such as 157 yards. This allows you to select the best club for your shot.
To use this data strategically, make certain you:
- Confirm the sprinkler’s position relative to the fairway and green to avoid misreading distances.
- Cross-reference sprinkler yardages with flag color and height to adjust for pin placement (front, middle, back).
- Account for course-specific variations where sprinkler distances might differ slightly due to elevation or layout.
Also, understanding your club’s static loft can help you better translate these distances into effective shot selection by anticipating the trajectory and spin characteristics of your approach shots.
Course Variations in Flag Colors and Distances
Although many golf courses adhere to standard flag color conventions, variations in flag colors and distances frequently occur, impacting your approach strategy.
For example, some courses replace the typical blue flag at the back of the green with yellow or black flags, signaling different pin placements like back left.
At Drift Golf Club, red flags mark the front, yellow the middle, and white the back, deviating from the usual red-white-blue system.
Additionally, the distance between front and back pins can range from 10 to 20 yards, affecting club selection and shot accuracy.
You’ll also encounter differing flagstick height indicators and yardage markers, which vary by course but generally follow a front-middle-back logic.
Understanding these nuances assures you interpret flag colors and positions correctly for precise shot execution.
At exclusive courses like Diamante Golf Course, mastering flag color and position interpretation is essential for navigating the links-style layout and varying wind challenges.
Planning Approach Shots Using Flag Colors and Yardages
Since accurate approach shots depend heavily on distance and pin placement, understanding flag colors and yardage markers is essential for precise club selection. You’ll want to interpret flag colors correctly: red indicates the front, white the middle, and blue the back of the green.
Combine this with yardage markers: red for 100 yards, white for 150, blue for 200, to gauge your shot length accurately. Use flagstick height to confirm pin location: low for front, middle for center, high for back.
Reference sprinkler heads for exact yardages when available. Adjust club choice based on the distance between front and back pins, often 10-20 yards apart.
This approach optimizes shot accuracy, minimizes distance errors, and helps you confidently target the pin. For consistent results, maintaining proper hip and shoulder alignment during your swing is crucial to steering shots straight towards the target.
Driving Range Flags and Their Distance Markers
When you step onto the driving range, the flag colors and their corresponding distance markers provide immediate, essential feedback for gauging your shot length.
Typically, white flags mark 75 yards, yellow flags 100 yards, red flags 150 yards, and blue flags 200 yards from the tee box, though exact distances can vary by course.
White flags indicate 75 yards, yellow 100, red 150, and blue 200 yards from the tee box.
Some ranges also display combined red/white flags at 180 yards or use sprinkler heads with precise yardages like 157 yards.
These markers help you calibrate your swing by offering clear, measurable targets.
Understanding the placement and color coding allows you to quantify your shot distances accurately, ensuring focused practice and better control over yardage during real play.
Always check your specific range’s flag color standards, as they may differ slightly.
How Flag Colors Affect Club Selection?
Because flag colors indicate the pin’s position on the green, they directly influence your club selection for approach shots.
When you see a red flag, expect the hole to be at the front, so you’ll likely choose a shorter club to avoid overshooting.
A white flag signals a middle position, requiring a club that covers standard yardage.
Blue or black flags mark back pins, demanding a longer club to reach the deeper green sections.
Adjusting your club choice based on flag color guarantees accuracy and better scoring opportunities.
- Red flag: hole at front; select a club for a shorter distance.
- White flag: hole at middle; use a standard approach club.
- Blue/black flag: hole at back; pick a longer club to cover extra yards.
Tips for Quickly Spotting Flag Information on the Course
Keep an eye on the flag’s color and height to quickly determine the pin’s location on the green. Flag color indicates front (red), middle (white), or back (blue/black) pin placement.
Flagstick height confirms this visually. Combine these cues with yardage markers: red for 100, white for 150, blue for 200 yards to refine your approach shot.
Sprinkler heads and range flags provide exact distances, enhancing precision.
| Flag Color | Flag Height Position | Yardage Markers (Yards) |
|---|---|---|
| Red | Low (Front) | 100 |
| White | Middle | 150 |
| Blue | Top (Back) | 200 |
| Yellow | Varies (Back Left) | Variable |
| Black | Top (Back) | Variable |
Use this system to make quick, informed club selections.
Frequently Asked Questions
How Often Do Courses Update or Change Their Flag Color Schemes?
You’ll find golf courses rarely update or change their flag color schemes. Most stick to established standards for consistency and player familiarity.
However, occasional changes occur during course renovations or when management wants to differentiate their course uniquely. If they do adjust, they communicate it clearly to avoid confusion.
What Materials Are Golf Flags Typically Made From?
Just like a knight’s banner must withstand fierce winds, golf flags are typically made from durable, weather-resistant materials like nylon or polyester.
These synthetic fabrics provide vibrant color retention and resist tearing, guaranteeing clear visibility through rain or sun.
You’ll find flags designed for both flexibility and strength, allowing them to flutter without damage.
This precision in material choice guarantees your visual cues remain reliable during every round.
Can Weather Affect the Visibility of Flag Colors During Play?
Yes, weather can markedly affect the visibility of flag colors during play.
Rain, fog, and low light reduce contrast, making it harder for you to distinguish flag colors from a distance.
Bright sunlight can cause glare, washing out colors.
Wind can cause flags to flap vigorously, distorting their appearance.
You should account for these factors when reading flags to accurately judge pin positions and adjust your approach shots accordingly.
Are Flag Colors Standardized Internationally or Vary by Country?
Think of flag colors like regional dialects in language; they’re not universally standardized.
While many courses follow common conventions (red for front, white for middle, blue for back), you’ll find variations depending on the country or even the individual golf course.
Some places use yellow or black flags differently.
So, you can’t assume flag colors mean the same everywhere.
Always check local course guides to interpret them accurately during play.
How Are Flags Maintained to Ensure Accurate Distance Markings?
You maintain flags by regularly verifying their placement against precise GPS and laser measurements to guarantee accuracy.
You’ll inspect flagsticks for wear or damage that could alter height indicators and recalibrate them if needed.
Routine checks confirm markers align with actual yardages, adjusting for course changes like green reshaping.
Keeping detailed logs of measurements helps you track consistency, guaranteeing every flag’s position accurately reflects its intended distance for reliable shot planning.
Know the Flag, Pick the Right Club
Mastering flag colors is like having a secret map to the course’s hidden treasures. By reading flagstick height, yardage markers, and sprinkler head distances, you’ll pinpoint pin positions with laser accuracy.
This knowledge sharpens your club selection and approach shots, turning guesswork into precision. So, next time you tee off, let flag colors guide your strategy like a compass. Transform every swing into a calculated step toward lowering your score.