
If your golf cart isn’t charging, first check the battery for cracks, leaks, or corrosion on terminals that can hinder power flow. Confirm the charger matches your battery’s voltage and chemistry, and test the outlet voltage to rule out power supply issues.
Inspect charge receptacle wires, especially the control wire, for damage or loose connections. Also, consider how your cart’s control electronics and BMS manage charging safety and efficiency. Exploring these areas can uncover the root cause and guide your next steps.
- Key Takeaways
- Golf Cart Battery Health Checks Before Charging
- Troubleshooting Common Golf Cart Charger and Power Supply Problems
- Fixing Faulty Golf Cart Charge Receptacles and Circuit Connections
- Verifying Charger and Battery System Compatibility
- How do Control Electronics and Battery Management Systems Affect Charging?
- Frequently Asked Questions
- How Often Should Golf Cart Batteries Be Replaced for Optimal Performance?
- Can Extreme Weather Affect Golf Cart Charging Efficiency?
- What Are the Signs of a Failing Golf Cart Charger Beyond No Charge?
- Is It Safe to Charge a Golf Cart Battery Indoors?
- How Does Regenerative Braking Influence Golf Cart Battery Life?
- Power Restored: Getting Your Golf Cart Back on Course
Key Takeaways
- Inspect batteries for damage, corrosion, and secure connections to ensure proper charging contact and prevent shorts or resistance.
- Verify charger compatibility with battery voltage, amperage, and chemistry to avoid undercharging or overheating.
- Check charger power supply, outlet voltage, fuses, breakers, and status indicators for electrical faults or interruptions.
- Examine charge receptacle wiring, clean corrosion, test fuses, and replace damaged connectors for reliable current flow.
- Confirm control electronics and BMS function properly to manage charging safety, balance cells, and prevent overcharge conditions.
Golf Cart Battery Health Checks Before Charging
Before charging your golf cart batteries, start by thoroughly inspecting their physical condition. Check battery cases for cracks, bulges, or swelling, as these indicate internal damage or overheating risks.
Look for acid leaks, wetness, or discoloration around the case and tray, which could cause short circuits. Examine terminals and cable ends for corrosion, pitting, or melted lead, as these increase resistance and heat during charging.
Verify cable insulation and lugs for fraying, looseness, or burns to prevent arcing or uneven current flow.
Confirm batteries are securely mounted and aligned to avoid vibration and case damage. Using weather-resistant finishes on battery terminals and connectors can help protect against corrosion and extend battery life.
Additionally, performing a voltage check with a digital multimeter can help identify if the battery pack maintains proper system voltage before charging. Checking these factors guarantees safe, efficient charging and prevents premature battery failure or hazards during use.
Troubleshooting Common Golf Cart Charger and Power Supply Problems
Ensuring your golf cart batteries are in good condition is only part of maintaining reliable charging performance. Start by verifying the AC power supply: use a multimeter to confirm your wall outlet voltage is within the 110–120 V range.
Checking your wall outlet voltage ensures a stable AC supply for consistent golf cart battery charging.
Check circuit breakers or fuses for tripping, and avoid long or undersized extension cords that cause voltage drops. Test the charger on a different known-good outlet to isolate wiring issues. Proper power supply stability is essential to prevent charger malfunctions and maintain consistent charging cycles.
Next, diagnose charger faults by observing status LEDs or display codes for errors like over-temperature or internal faults. If the charger fails to power up or behaves abnormally, such as shutting off early or never stopping, suspect internal component failures.
Perform a full power reset by unplugging the charger and using any reset button to clear fault states before retesting. Chargers may encounter errors from power surges, electrical faults, or battery problems, so resetting clears temporary faults and can restore normal charging operation.
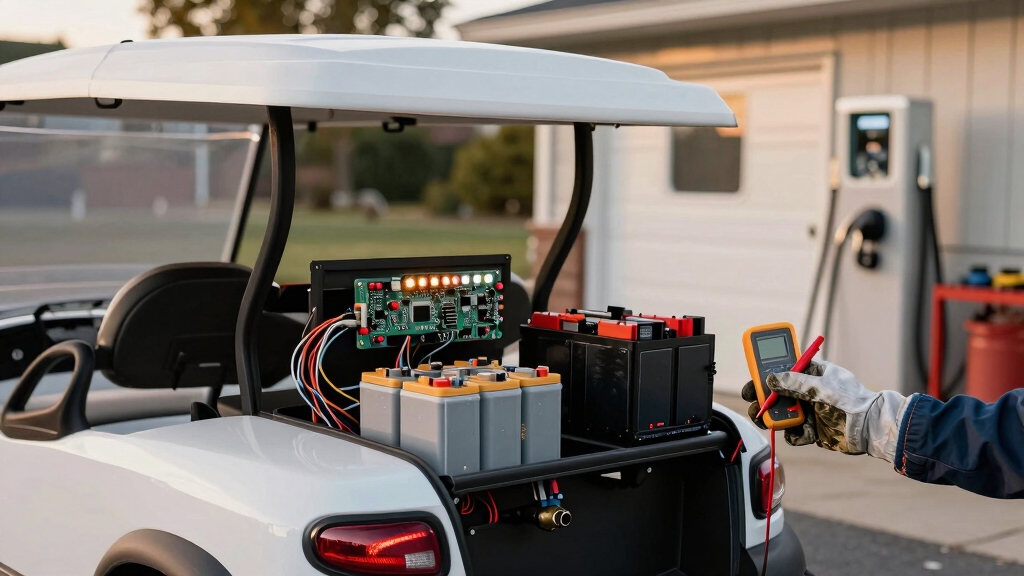
Fixing Faulty Golf Cart Charge Receptacles and Circuit Connections
When diagnosing charging issues, start by checking the golf cart’s charge receptacle and circuit connections for faults.
Inspect the three-wire configuration: red (positive), black (negative), and grey (on-board computer control) for corrosion, breaks, and secure attachment.
Pay special attention to the grey wire inside the receptacle; if damaged or pulled out, replace the receptacle.
Test the fuse via multimeter continuity between the two black wires and verify relay function by listening for a click when the charger plug is inserted.
Clean corrosion from terminals and connectors using a wire brush and appropriate cleaning solution to restore electrical flow.
Tighten all cable clamps and confirm correct wiring configuration to ensure optimal voltage supply to the charging system.
Replace any internal wire breakages or faulty components to assure reliable charging system operation.
Before starting, perform an initial voltage check to ensure the battery pack voltage is within the required range to trigger the charger turn-on signal.
Verifying Charger and Battery System Compatibility
To verify charger and battery system compatibility, you need to match the charger’s voltage, amperage, and connector type precisely with your golf cart’s battery specifications.
Incorrect voltage risks overcharging or undercharging, damaging your batteries. Amperage must align with manufacturer recommendations to avoid overheating. Choosing the right battery type, such as flooded lead-acid or AGM, affects maintenance and charging needs, so ensure your charger matches the battery chemistry for optimal results.
Physical connector compatibility ensures a secure, functional connection. Focus on these key points:
- Voltage Matching: Confirm your charger matches your 36V, 48V, or 72V battery pack voltage exactly to prevent battery damage.
- Battery Chemistry: Use chargers designed for your battery type, lead-acid or lithium-ion, to guarantee proper charging profiles and safety.
- Connector Type: Verify plugs like Powerwise, SB50, or MAC fit your cart’s receptacle to avoid electrical faults or charging failure.
Additionally, pairing your battery with a charger that integrates with its battery management system (BMS integration) can significantly extend battery life and improve safety. Assuring these elements align protects your battery life and optimizes charging efficiency. For best performance, consider batteries with proven deep cycle design that support sustained power delivery in golf cart applications.
How do Control Electronics and Battery Management Systems Affect Charging?
Control electronics and battery management systems (BMS) play a critical role in regulating how your golf cart’s batteries charge. These systems monitor voltage, current, and temperature to ensure safe and efficient charging.
The BMS prevents overchargingsby balancing cell voltages, which extends battery life and maintains performance.
Control electronics manage charging profiles, adjusting parameters based on battery condition and environmental factors. Many advanced chargers offer customizable charge profiles that can be configured via dedicated apps to match battery chemistry and usage.
Without proper BMS function, you risk battery damage, reduced capacity, or charging failures. While specific technical details vary by manufacturer, understanding that the BMS communicates with the charger to optimize energy flow is key.
If your golf cart isn’t charging properly, inspecting the control electronics and BMS for faults or misconfigurations should be part of your troubleshooting process. Increased power draw and heat generation from modifications like limiter removal can also negatively affect charging efficiency and battery health, underscoring the importance of battery management.
Frequently Asked Questions
How Often Should Golf Cart Batteries Be Replaced for Optimal Performance?
You should replace your golf cart batteries every 4–6 years for lead-acid types and 8–10 years for lithium batteries to guarantee peak performance.
High usage, deep discharges, and improper charging habits can shorten this lifespan, so monitor range, acceleration, charging times, and physical signs closely.
Following manufacturer guidelines and performing regular maintenance like watering and cleaning will help you maximize battery life and replace them proactively before performance declines.
Can Extreme Weather Affect Golf Cart Charging Efficiency?
Yes, extreme weather substantially affects your golf cart’s charging efficiency. Cold temperatures reduce battery capacity by up to 50% and slow chemical reactions.
Heat accelerates wear and increases water evaporation in lead-acid batteries. Lithium-ion batteries perform better in both extremes but still benefit from temperature-controlled charging.
To maintain efficiency, use temperature-compensated chargers, allow batteries to cool after hot use, and protect electrical components from moisture.
What Are the Signs of a Failing Golf Cart Charger Beyond No Charge?
When your charger hums like a warning siren or heats up like a midday sun, it’s signaling distress.
You’ll notice slow charging, incomplete cycles, or erratic stops.
Frayed cables, cracked casing, or burned smells reveal internal damage.
Error lights flash diagnostic alerts, while inconsistent charging causes your cart’s sluggish performance and reduced range.
These are precise indicators your charger’s reliability is fading and needs prompt inspection or replacement.
Is It Safe to Charge a Golf Cart Battery Indoors?
Charging your golf cart battery indoors is generally unsafe unless you guarantee excellent ventilation.
Hydrogen gas emitted during charging can accumulate in enclosed spaces, creating explosion risks.
If you must charge indoors, keep garage doors and windows open for cross-ventilation.
Avoid ignition sources and use a manufacturer-approved charger.
Always place the cart on a non-combustible surface away from flammable materials.
Following these precautions minimizes fire and health hazards during indoor charging.
How Does Regenerative Braking Influence Golf Cart Battery Life?
Regenerative braking extends your golf cart battery life by recovering kinetic energy during deceleration and converting it into electrical energy stored back in the battery. This reduces how often you need to charge, lessening battery strain and wear. It also minimizes reliance on friction brakes, decreasing mechanical wear.
Power Restored: Getting Your Golf Cart Back on Course
When your golf cart isn’t charging, remember: batteries and chargers must work in harmony like a well-tuned orchestra. You’ve checked battery health, inspected connections, and verified compatibility—all vital steps to avoid silent failures.
Don’t overlook control electronics and management systems, as they play a pivotal role in efficient charging. By methodically troubleshooting each component, you’ll guarantee your cart powers up reliably, ready to keep you moving on the course without interruption.